Create & Sell Online Courses with ease, using Squarespace 7.1
Transform your expertise into passive income with ease.
The benefits of online courses (and why you should try it)
Let’s face it—passive income is the dream. Being able to make money while you sleep? Yes, please. For many new and aspiring or established businesses exploring ways to generate passive income, online courses probably come to mind. They’re practical, scalable, and an amazing way to share your expertise with the world.
What’s even better? Squarespace makes the whole process seamless. If you’ve ever thought about creating a course for your audience, I’m here to walk you through setting it up directly on your Squarespace 7.1 site. Spoiler alert: It’s easier than you think!
The challenge: setting up courses for your website
You might be wondering, How do I even start offering courses on my Squarespace site? I hear you. While the idea of creating a course sounds exciting, it can also feel overwhelming to figure out the tech side. The good news? With Squarespace’s built-in tools, you don’t need to be a tech wizard to get your course up and running.
Your step-by-step guide to building a course on Squarespace
Ready to dive in? Here’s how to create, design, and sell your online courses like a pro:
1. Check your prerequisites
Before we jump in, let’s cover the basics:
Squarespace version: Make sure you’re using Squarespace 7.1, as the Courses feature is exclusive to this version.
Subscription plan: You’ll need a Business plan or higher. Keep in mind that the business plans include 30 minutes of video storage and a 9% transaction fee on sales.
2. Add your course page
**Note: On some templates, such as the Gazania Extended, this page is already designed for you and ready to add your content.
Head to your dashboard and navigate to the Pages section.
Click the "+" button to add a new page, then select Course.
Choose a layout that fits your content and brand vibe. (Don’t worry; everything is customizable!)
3. Configure your course settings
Click the gear icon next to your course page to tweak the details.
Update the Page Title, URL Slug, and add a sparkling Course Summary that hooks your audience.
4. Design a user-friendly course overview page
Once someone enrolls, they’ll navigate the course through an overview page.
Use this page to display chapters, lessons, and progress tracking.
Keep it clean, intuitive, and visually aligned with your brand.
Use the design tools to style however you wish. You have control over the content you show, colours, spacing, button styles, and other design elements by clicking the “Edit Layout” option in the top-right menu.
Top tip: Consider adding a contact form to the bottom of this page for students to submit support tickets or add a FAQ section to help answer common questions.
5. Structure your course content
This is where the magic happens! Break your course into bite-sized, digestible pieces:
Organize your material with Chapters.
Add Lessons within each chapter—think videos, PDFs, text, and images.
You can either upload videos directly or embed them from platforms like YouTube or Vimeo.
Customize layouts and design for a seamless, branded experience.
6. Set up your pricing options
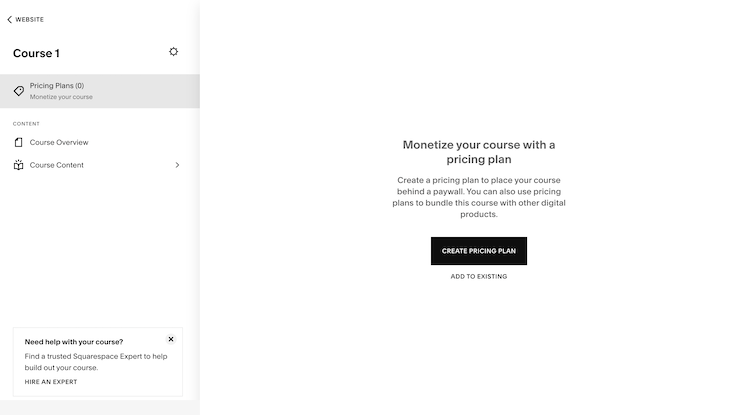
In the course editor, head to Pricing Plans and decide how you’ll charge:
Fixed Price: One-time payment for lifetime access.
Subscription: Recurring payments create a steady revenue stream.
Free: A great way to attract new students or build your email list.
Pro tip: Add details like plan names, descriptions, and any extra perks to entice potential buyers.
If you are adding multiple courses for the price of one, or other offerings, you might want to consider setting up a Member site and adding the course to a payment plan there instead.
7. Customize the paywall page
This is the page visitors see before purchasing your course. I recommend creating a sales page for this, with sales-driven content like what the course is, who it’s for, what they’ll gain from it, what makes your course unique, and what it includes. This is where you will drive potential members to sign up, so make it compelling.
8. Launch your course!
Double-check everything—your content, pricing, and settings. Then, hit publish and voila! You’ve officially launched your course.
Next steps: promoting your course
Now that your course is live, it’s time to spread the word:
Email campaigns: Use Squarespace’s marketing tools to let your subscribers know about your new course or my favourite, Flodesk!
SEO: Optimize your course page with relevant keywords so people can find you online and ensure your pages have SEO titles and descriptions.
Social media: Share your course across your platforms to reach more potential students.
Summary
Creating and selling online courses on Squarespace is more achievable than ever. By following these simple steps—checking your prerequisites, organizing your content, setting pricing strategies, and customizing your course pages—you’ll be well on your way to turning your expertise into a steady stream of income. Squarespace’s intuitive tools make it possible to overcome the technical hurdles so that you can focus on delivering an exceptional learning experience for your audience.
Conclusion
Whether you’re looking to scale your business, build passive income, or simply share your knowledge, online courses are one of the most effective ways to achieve these goals. With Squarespace, you can transform a once-daunting process into a seamless journey that empowers you to create and sell courses like a pro.
So, what are you waiting for? Start building your course today and unlock the potential to educate, inspire, and grow your brand!
Need More Help?
Let’s make your course launch stress-free! Book a chat with me today, and we’ll work together to bring your Squarespace courses to life. I can help you set up courses, memberships, and sales pages, so you can focus on creating amazing content while I handle the tech side.


